Affichage des articles dont le libellé est Blouses. Afficher tous les articles

4 avril 2016

Blouse Stockholm

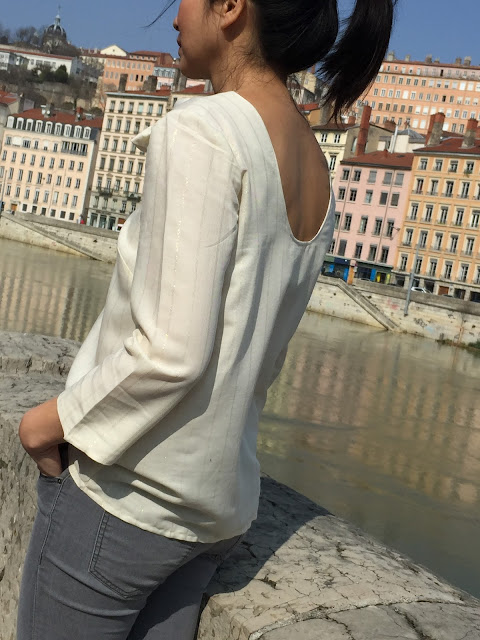
Il y a quelques semaines Johanna m'a proposé de participer à son événement consacré au lancement de la blouse Stockholm... J'ai accepté avec plaisir !!!
Dès que j'ai vu la coupe Stockholm, j'ai aimé les manches raglan mais les basques ;))) Ainsi j'ai eu envie de donner un style aérien donc j'ai priviliégié la fluidité maximum. Et donc j'ai choisi d'utiliser ce superbe polyester ajouré et très fluide déniché chez Pretty Mercerie. Et oui j'aime le suggéré et il faut dire que les tissus ajourés cette année ;)))
... Bonus : le passepoil "or" s'est imposé pour valoriser les manches raglan ...


Niveau : Débutant - Temps de réalisation : 3h - Coût : €€€


En préambule, la blouse Stockhom est simple à réaliser aussi elle existe avec ou sans basque aux manches... Bien sur vous pourrez la décliner en version robe en rajouter quelques cms ;)))

Pour cette première version, j'ai priviliégié la version avec manches aux basques qui prendront toutes leurs ampleurs avec la fluidité du tissu ajouré. 
Alors je dois dire que l'utilisation du polyester vous demandera une patience et minutie en effet c'est fluide donc ça glisse... Donc j'ai doublement épinglé au moment de la découpe tout en sachant que les marges 1,2 cm sont incluses.
Une fois les pinces cousues, une étape clé : la pose du passepoil arghhhh challenge. Ainsi je l'ai fait en deux étapes !!! J'ai cousu mes 4 morceaux passepoils sur les bords raglan puis posé et cousu l'autre côté de chacune des manches.
Pour bien maintenir les passepoils, j'ai effectué une surpiqûre additionnelle.
Bien entendu, vous pouvez vous passer l'étape passepoil ;)))


Désormais penchons nous sur les basques aux manches. Vous devrez effectuer les 4 plis sur la base des repères indiqués au préalable. Une fois cette opération réalisée vous allez les coudre aux manches.

Dernière étape, j'ai posé un biais pour le col pour les finitions et le maintien.
Pour l'ensemble des ourlets, j'ai choisi un point roulotté pour les basques manches et le bas.  Et voilà votre blouse est prête !!! 

En conclusion la blouse Stockhom est accessible aux débutantes et confirmées qui aiment tester nouvelles matières ou associations telle que ma version. Enfin je ne regrette pas d'avoir osé ce tissu avec le passepoil car j'adoooore le résultat et j'ai pris goût à la maille ajouré ;)))

Patron : Blouse Stockholm by l'Atelier Scammit

Tissu : T36 - Maille ajourée by Pretty Mercerie (1,30m x Laize 1,50m) - 17,50€/m - Passepoil or by Fil 2000 (1m)

---------------------------------------------------------------------

Just a few weeks Johanna asked me to participate in the event dedicated to the launch of the blouse Stockholm ... I accepted with pleasure !!!
As soon as I saw the cut of Stockholm blouse, I liked the raglan sleeves also the "basques" ;))) So I wanted to give an "air" style so I chose a fabric with the maximum of fluidity. And so I  use this open weave knit and very fluid unearthed in Pretty Mercerie. And yes I like the suggestion and I must say that the open weave fabrics this year;)))
... Bonus: the gold piping  has emerged to value raglan sleeves ...


Level: Beginner - Timing : 3 hours - Cost : €€€


In the preamble, the Stockhom blouse is simple to make as it exists with or without "basque" sleeves... Of course you can decline the dress version add a few cms;)))

For this first version, I make the version with "basque" sleeves who take all their magnitudes with the fluidity of open weave knit.
So I must say that the use of knit ask you for patience and thoroughness in fact so it is fluid that slips ... So I pinned the doubling time of cutting in the knowledge that margins are 1.2 cm included.
Once sewn pleats, a key step: installing the piping arghhhh challenge. So I did it in two steps !!! I sewed my 4 pieces piping on the edges and sewn raglan then asked the other side of each heat.
To maintain the piping, I conducted an additional stitching.
Of course, you can spend the piping stage;)))


Now we look at the "basque" sleeves. You need to do the 4-fold based on the marks shown beforehand. Once this is done you will sew the sleeves.

Last step, I asked a bias for collar for finishing and maintain.
For all hems, I chose a point for rolled sleeves and skirts down. And that your gown is ready !!!

In conclusion, the Stockhom blouse is open to beginners and confirmed who enjoy testing new fabrics or associations as my version. Finally I do not regret having dared this fabric with piping because j'adoooore the result and I took a liking to the openwork mesh;)))

Pattern: Blouse Stockholm by  l'Atelier Scammit

Fabric: UK8 - Open weave knit by Pretty Mercerie (1,30m x Width 1,50m) - € 17.50 / m - gold piping by Fil 2000 (1m)
.

28 mars 2016

Blouse Petra

Voilà un petit moment que j'avais envie d'une blouse avec une ceinture intégrée et surtout un col V. Et la nouvelle collection Sezane m'a définitivement motivé, particulièrement la blouse Strada. Ainsi je suis partie à la quête du tissu et du patron, qui pourrait répondre pleinement à cette idée !!!!
Ainsi j'ai fouillé dans mes patrons et la la la j'ai choisi le haut de la combinaison Petra Louisantoinette Paris pour son croisé et ses petites manches. A moi de jouer sur cette belle base ;)))
Et le tissu !!! Et bien c'est Pretty Mercerie qui comblera cette envie à travers ce coton a rayures "miel" !!!! J'imaginais déjà le bandeau ceinture en sens inverse pour jouer sur le contraste des rayures verticales.


Niveau : intermédiaire - Temps de réalisation : 3h - Coût : €€


En préambule, j'ai repris le patron du haut de la combinaison Petra sans réelle modification. Pour donner plus de tenue au devant droit superposé, je l'ai coupé deux fois de façon à le doubler donc cousu end /end à la moitié de la marge de couture. Cette opération fera que vous n'aurez besoin que d'un seul côté de l'encolure initialement proposé. Ainsi je n'ai gardé qu'un côté de l'encolure et le V pour le devant gauche.


Pour parfaire cette superposition, j'ai sur épinglé et surpiqué le devant droit en prenant soin d'intégrer le devant gauche, tout en gardant au mieux la continuité des rayures. Puis j'ai surpiqué le haut du décolleté du devant gauche.


Une fois cette opération réalisée, vous monterez les manches et la ceinture. Pour cette dernière, vous couperez un bandeau d'une longueur de 1,60 m et d'une largeur de 10cm ainsi j'ai réalisé un bandeau en prenant 1 cm de chaque côté et plié en deux à l'aide de votre centrale vapeur. 
Attention : laissez votre ceinture ouverte de façon à prendre en sandwich le bas de votre blouse.
Une fois votre ceinture prête, vous la positionnerez au niveau du croisement et l'affaire est jouée ;))))

Je dois dire que je suis ravie du résultat et je peux d'ores et déjà vous dire que ce ne sera pas la dernière ;)))))

PatronCombinaison Petra by Louisantoinette Paris (15€ en pochette)

Tissucoton a rayures "miel"  by Pretty Mercerie (1,50m x Laize 1,35m, 70gr) - 10,50€/m

-----------------------------------------------------------------------------

That's a while since I felt like a blouse with an integrated belt and especially a V neck and the new Sezane collection definitely motivated me, particularly the Strada blouse. So I went in search of fabric and pattern, which could fully meet this idea !!!!
So I reached into my patterns and the I picked up the Petra jumpsuit by Louisantoinette Paris for it crossover and small sleeves. At me to play on this beautiful base;)))
And fabric !!! Well it's Pretty Mercerie that will satisfy this desire through this Cotton light "honey" stripes !!!! I already imagined the opposite direction headband belt to play on contrasting vertical stripes.


Level: Intermediate - Timing : 3 hours - Cost : €€


As a preamble, I took the pattern from the top of the Petra jumpsuit no real change. To give more held in front bunk right, I cut two times to line the thus sewn end / end in half the seam allowance. This will make you only need one side of the neck originally proposed. So I kept that side of the neck and V left front.


To complete this superposition, I pinned and stitched on the right front, taking care to integrate the front left, keeping the best continuity scratches. Then I stitched up the neckline of the left front.


Once this operation made, climb the sleeves and waist. For the latter, you will cut a headband with a length of 63 inches and a width of 4inches and I made a banner by taking 1 cm on each side and folded in half using your steam plant .

Warning: leave your open belt to sandwich the bottom of your blouse.
Once ready your belt, you can position at the intersection and the case is played;))))

I must say I am happy with the result and I can already tell you that this will not be the last;)))))

Pattern: Petra jumpsuit by Louisantoinette Paris (€ 15 in pocket)

Fabric : Cotton light "honey" stripes by Pretty Mercerie (55 inches x 53 inches Width, 70gr) - € 10.50 / m

21 mars 2016

Blouse Milan

Après la blouse Cézembre et la jupe Pixa, voici la dernière merveille d'Anne K. Couture : la blouse Milan. D'ailleurs, Anne lance son nouveau site et surtout ses patrons sont désormais disponibles en pochette ;)))

Comme toutes ses créations, elle dispose d'une coupe intemporelle et offre deux déclinaisons : l'une avec des volants aux empiècements épaule et des manches 3/4 avec des poignets biseautés et l'autre avec des mancherons froncés. Et et le dos échancré disponible sur les 2 versions.

Pour cette première réalisation, j'ai opté pour la version avec les volants aux épaules en effet c'est le détail phare de cette année. Ainsi j'ai choisi la dernière cotonnade à rayures lurex by Aniline, une pure merveille !!!! Fabriquée en France,  elle est idéale pour la réalisation de chemise, top ou blouse et un vrai régal à porter c'est tout doux !!!!!!!
Aussi, pour valoriser les deux volants, j'ai ajouté un passepoil "or" assorti au lurex en guide de rappel ;)))


Niveau : Intermédiaire - Temps de réalisation : 3H - Coût : €€€


La blouse Milan dispose d'un montage simple à réaliser en effet elle dispose de peu de pièces pour 1,50m de tissus. Elle peut être déclinée en différents tissus : coton, soie, crêpe, viscose, ... 


Pour cette première version, j'ai opté pour un coton & viscose fluide (90gr) de façon à délivrer un style "aérien"et valoriser au mieux les nombreux détails qui font la différence.


Ainsi, la principale étape est la réalisation des volants et leur insertion d'autant plus si vous optez pour le passepoil. J'ai choisi de doubler les volants de façon à leur donner plus de consistance et surtout une belle finition. Une fois cousus, vous devrez les "froncer" afin d'obtenir la largeur optimale des empiècements épaule. Pour réussir l'insertion du passepoil, j'ai d'abord cousu les volants puis ajouté le passepoil de façon à prendre en sandwich celui ci et utilisé le pied fermeture pour coudre à raz.


Une fois cette étape réalisée, vous poserez les parmentures au col, dos et les poignets biseautés qui vous offriront de belles finitions. 

En conclusion, si vous cherchez une blouse aux multiples détails et simple à réaliser, la blouse Milan est faite pour vous et ne laissera pas indifférent ;)))


Patron : la blouse Milan by Anne K. Couture  (7€ en pdf et 15€ en pochette)

Tissu : T 36 - cotonnade à rayures lurex by Aniline - Fabriquée en France (1,50m x Laize 1,45m) - 25€/m - Passepoil OR (30cm) by Fil 2000 - 1,80€/m  

------------------------------------------------------------------------------

After Cézembre shirt and the Pixa skirt, here's the latest pattern of Anne K. Couture  : the Milan shirt. Such as her creations, she has a timeless design and provides two versions : one with the sewing ruffles on shoulder yokes and 3/4 sleeves with beveled cuffs and the other with knitted sleeves. And scooped back and available in 2 versions.

For this first project, I opted for the version with the sewing ruffles on shoulder in fact it is the flagship retail this year. So I chose the last to cotton lurex stripes by Aniline, just great !!!! Made in France, it is ideal for making shirt, top or blouse and a real happiness to wear that is soft !!!!!!!
Also, to enhance both steering wheels, I added a "gold" piping matched with lurex ;)))


Level : Intermediate - Timing : 3 hours - Cost : €€€


The Milan shirt with simple assembly to create indeed it has little of pieces for fabric of 60 inches. It can be made in different fabrics : cotton, silk, crepe, viscose, ...


For this first version, I opted for a cotton & viscose fluid (90gr) to issue an "air" style and make the best the many details that make the difference.

Thus, the main stage is the making of sewing ruffles and inclusion especially if you opt for the piping. I chose to double ruffles to give them more consistency and especially a beautiful finish. Once sewn, you will have the "pucker" in order to obtain the optimum width of the shoulder yokes. To be successful insertion of piping, first I have sewn ruffles and added the piping so as to sandwich this one and used the closure foot tidal sewing.


Once this step, you will ask the facings to the neck, back and beveled cuffs that offer you beautiful finishes.

In conclusion, if you are looking for a blouse with many details and simple to perform, the Milan shirt  is for you and will not leave indifferent;)))


PatternMilan shirt  by Anne K. Couture (7€ in pdf and 15€ in pocket)

Fabric : UK8 - cotton striped lurex by Aniline - Made in France (1,50m x Width 1,45m) - 25 € / m - Piping OR (30cm) by Fil 2000 - € 1.80 / m


16 mars 2016

Blouse Sirocco Liberty

Il y a quelques jours, vous avez découvert ma toute première version de la blouse Sirocco by Dessine moi un patron toute de marinière lurex ;))
Des le départ, j'ai imaginé une multitude de déclinaisons car c'est LA pièce confortable et à porter tous les jours !!!!
Pour la toute première version, j'ai choisi ce sublime coton liberty of London Firework déniché chez L'Atelier de Dina. En plus d'un imprimé distinctif, je peux vous dire que la qualité est fantastique : doux et incroyablement agréable à coudre !


Niveau : Débutant - Temps de réalisation : 2h - Coût : €€


Comme je vous l'indiquais, la blouse Sirocco by Dessine moi un patron  est un modèle qui peut être déclinée selon les envies du moment donc avec différents types de tissus.


Après la version jersey marinière lurex, elle se décline volontiers en coton et elle reste toujours un régal à coudre. A noter que ce liberty est un délice à coudre : Ça glisse sans compter que la Sirocco devient une seconde peau ;))


Aussi je vous invite à vous reporter à la Sirocco N°1 pour les détails de conception en effet la facilité reste identique même si vous optez pour un tissu différent.
Pour la patte et son bouton, j'ai opté pour une teinte argentée by La Droguerie tout en rondeur de façon à le valoriser sur cet imprimé expressif.

Vous l'aurez compris la blouse Sirocco by Dessine moi un patron est un de mes patrons chouchou pour inaugurer le printemps sous les meilleures auspices ;))) Alors ne soyez pas surprises si elle repointe le bout de son nez !!!!


Patronblouse Sirocco by Dessine moi un patron (15€ en pochette)

Tissu : T36 - coton liberty of London Firework by L'atelier de Dina - (1,30m x Laize 1,40m) - €/m - 2 boutons by La Droguerie (1,50€/pièce)

-------------------------------------------------------------------------

There are some days you have discovered my very first version of the Sirocco shirt by Dessine moi un patron in sailor lurex fabric ;))
Of the start, I imagined a multitude of variations because it is THE room and comfortable to wear all day !!!!
For the first version, I chose this sublime liberty coton of London Firework unearthed at L'Atelier Dina. In addition to a distinctive print, I can tell you that the quality is fantastic: soft and incredibly pleasant to sew!


Level: Beginner - Timing : 2 hours - Cost : €€


As I said you, the Sirocco shirt by Dessine moi un patronis a model that can be broken down according to the desires of the moment therefore with different types of fabrics.
After the release sailor lurex jersey, it comes readily cotton and it is still a treat to sew. Note that this liberty is a delight sewing: It looks like the Sirocco becomes a second skin;))


Also I invite you to refer to the  Sirocco N°1  for the effect on design details facility remains the same even if you opt for a different fabric.
For the tab and its button, I opted for a silvery by La Droguerie very round so the value of this expressive print.

You'll understand the Sirocco shirt by Dessine moi un patron is one of my favorite patterns for usher in the spring under the best auspices;))) So please do not be surprised if it points back the tip of his nose !!!!


Pattern: Sirocco shirt by Dessine moi un patron (15 € in pocket)


Fabric: UK8 - liberty coton of London Firework  - (40in x Width 50in) - € / m - 2 buttons by La Droguerie (1.50 € / piece)

14 février 2016

Aime comme Magellan N°2

Voilà quelques jours vous avez découvert ma toute première version "Maori" de la blouse Aime comme Magellan by Aime comme Marie, à revoir ;)))
A peine la version "Maori" terminée, je n'avais qu'une seule envie en coudre une nouvelle et valoriser davantage les fronces !!! 
Après avoir utilisé la fluidité de la viscose, j'ai choisi un tissu plus consistant donc une double crêpe de laine noire by Bennytex (510 gr) pour donner un effet volume aux fronces... Pour valoriser ce détail, j'ai décidé d'y ajouter un passepoil "OR" acquis chez Fil 2000 (Paris).


Niveau : Intermédiaire (voir débutant ++) - Temps de réalisation : 2h30 - Coût : €€


A nouveau, Aime comme Magellan est un modèle accessible et surtout déclinable avec différents types tissus. En effet, j'ai testé la fluidité de la viscose (120gr) et crêpe de laine (510gr) et ça fonctionne aisément ;))) 


Plus vous optez pour un tissu consistant, plus vos fronces auront du volume et je dois dire que l'effet est wahooo !!!!


Pour cette nouvelle version, j'ai utilisé la surjeteuse pour les bords de fronce à contrario de la version "Maori". Une fois les fronces posées, j'ai simplement inséré ce passepoil "OR" au moment du raccord haut froncé avec le bas du devant. Au regard de l'épaisseur, j'ai bâti de façon à être sûre qu'il soit bien pris en sandwich et facilité la couture à raz.
Pour le col, j'ai choisi d'utiliser un biais noir afin d'avoir une belle finition.


Patron Aime comme Magellan by Aime comme Marie (14€)

Tissu : T36 - Double crêpe de laine noire by Bennytex (1,70m x Laize 1,50m) - Coupon 3 mètres (29,90€)

-----------------------------------------------------------------------------------

A few days ago you found my first "Maori" version of the Aime comme Magellan blouse by Aime Comme Marie, to review ;)))
As soon as the "Maori" release made, I had only one desire in a new sewing and further enhance the gathers !!!
After using the fluidity of viscose, I chose a fabric more consisting so a double black wool crepe by Bennytex (510 gr) to give more volume to gathers ... To highlight this detail, I decided 'adding "gold" piping bought in Fil 2000 (Paris).


Level: Intermediate (see beginner ++) - Timing : 2:30 - Cost : €€


Again,  Aime comme Magellan is a model accessible and especially déclinable with different fabrics. Indeed, I tested the fluidity of viscose (120gr) and wool crepe (510gr) and it works easily;))


The more you choose a fabric consisting of more volume your gathers will and I must say that the effect is wahooo !!!!


For this new version, I used the serger for edges crease in contrast to the version "Maori". Once placed ruching, I simply inserted the "gold" piping at the time of fitting ruched top with the bottom of the front. Given the thickness I built so as to be sure it is properly sandwiched and ease sewing.
For the neck, I chose to use a black bias through to a nice finish.

PatternAime comme Magellan by Aime comme Marie (14 €)

Fabric: UK8 - Double crêpe de laine noire by Bennytex (67in x Width 55in) - Coupon 3 meters (€ 29.90)


5 février 2016

Aime comme Magellan

Voilà quelques jours, Marie et Cécilia m'ont proposé de tester en avant première la blouse Aime comme Magellan... 
Comme on peut le voir les fronces sont à l'honneur c'est le détail qu'on retrouve sur les cols, les manches et le buste ;)))
Je dois avouer qu'à la base je n'ai pas d'addiction particulière aux fronces mais ma dernière blouse Dahlia j'ai adoré travailler ce détail qui agrémente grandement un imprimé ;))) 
Ainsi le volant froncé de la blouse Aime comme Magellan m'a interpellé et pour marquer le coup j'ai pris le parti d'un imprimé expressif !!! 
De ce fait, j'ai choisi de marquer le coup à travers cette Viscose Marori bleue/rose by Cousette originale par son imprimé et surtout cette association bleu marine et rose malabar... J'imaginais déjà porter ma Magellan avec un jean sympa avec le volant froncé ;))) Aussi profitez en il y a une remise de 30% en ce moment !!!


Niveau : Intermédiaire (voir débutant ++) - Temps de réalisation : 2h30 - Coût : €€


En préambule, optez pour un tissu léger et fluide pour donner l'ampleur au volant froncé...Tout en sachant que je testerai bien une version en Néoprène pour voir l'effet sur le volant ;)))
Globalement, le montage est simple à réaliser en effet l'étape cruciale : le volant froncé. Avant toute chose important d'effectuer l'ourlet roulotté, je dispose d'un point adéquat sur ma Juki (c'est un point zig zag évolué) ou sinon la surjeteuse est idéale. 


Une fois le volant "roulotté" vous devrez réaliser les fronces avec un point large en sélectionnant la largeur maximum pour pouvoir tirer les fils de façon à ajuster à la fois aux empiècements devant et dos.
Une fois le montage du volant coudre le devant, dos et manches seront un jeu d'enfant ainsi il vous restera plus qu'à réaliser le biais pour l'encolure ton sur ton ou biais uni. 


En conclusion, si vous cherchez une blouse à porter au quotidien avec le détail et rapide à réaliser, Magellan est faite pour vous ;)))

Patron : Aime comme Magellan by Aime comme Marie (14€)

Tissu : T36 - Viscose Marori bleue/rose by Cousette (1,50m x Laize 1,40m)- 9,10€/m.

----------------------------------------------------------------------

A few days ago, Marie and Cecilia asked me to test the new shirt : Aime comme Magellan...
As we can see the gathers are in the spotlight is the detail found on the collar, sleeves and bust;)))
I must admit that basically I have no particular addiction for gathers but my last Dahlia shirt I loved working this detail that greatly complements to a printed;)))
And the ruffle of Aime comme Magellan challenged me and to mark the occasion I took advantage of an expressive print !!!
Therefore, I chose to mark the occasion through this Viscose Marori blue/pink by original seamstress by its printed and especially this navy blue and pink combination Malabar ... I imagined already wear my Aime comme Magellan with a nice jeans with the ruffle;))) So enjoy as there is a 30% discount now !!!


Level: Intermediate (see beginner ++) - Timing : 2:30 - Cost : €€


As a preamble, opt for a light and flowing fabric to give scope to ruffle ... Just knowing that I well will test a version neoprene to see the effect on the wheel;)))


Overall, the making is simple to perform in fact the crucial step: the gathers. Before any major thing to make the rolled hem, I have an adequate stock of my Juki (it's a zig zag evolved) or otherwise serger is ideal.
Once the wheel "rolled" you will realize the gathers with a broad point by selecting the maximum width to reap the son in order to adjust to both the front and back panels.


After mounting the wheel sew the front, back and sleeves will be a breeze and you will realize just means for neck tonal or through uni.
In conclusion, if you are looking for a gown to wear everyday with the detail and quick to perform, Magellan is for you;)))

PatternAime comme Magellan by Aime comme Marie (14 €)


Fabric: UK8 - Viscose Marori bleue/rose by Cousette (60 in x Width 50in) - € 9.10 / m.
Mydress-made. tous droits réservés. © Design : Elsa Gorre.